Push notification configuration is one of the most desired features when writing a mobile application. They can be used to send timely alerts about sales and promotions, new product launches, personalized recommendations, order updates, and customer support messages.
By effectively utilizing push notifications, app developers can make stronger relationships with their users, increase app engagement, usage, and ultimately get a boost in growth.
Intro
There are several ways to send notifications, including various libraries or using APNs specifically for iOS. We'll explore how to implement push notifications in your React Native app using Firebase Cloud Messaging (FCM). Firebase provides a robust and scalable solution for sending push notifications to Android and iOS devices.

For this example we will be using one of the WithFrame's pre-built chat components.
Here's a step-by-step walkthrough of the implementation. Before we dive into push notifications' implementation, ensure you have a well-structured React Native project set up. This will provide a solid foundation for integrating the necessary components and libraries.
We will be going throught these steps:
- Firebase Project Creation
- Firebase Installation
- Android Setup
- iOS Setup
- Code integration for push notifications
- Sending the test push notification
- Handling notification flow
Now let's get this started!
Firebase
1. Firebase Project Creation
To create a Firebase app, go to https://console.firebase.google.com and create a new project.
Once the project is created, add iOS & Android apps on the Firebase console and add configuration files to the React Native project.
In the case of iOS, we will get GoogleService-Info.plist and we will use this file to connect our iOS App with Firebase service.
For Android, we will get google-service.json, which will be placed in the Android native project.
2. Firebase Installation
We will start by installing the React Native Firebase app module to the root of your React Native project with NPM or Yarn:
npm install --save @react-native-firebase/app @react-native-firebase/messaging
yarn add @react-native-firebase/app @react-native-firebase/messaging
Lastly, we have to link the native packages:
npx pod-install
Android Setup
To connect the Firebase service with the Android application, we have to provide details on the Firebase app integration process, i.e. Android Project Name, Android package name, etc.
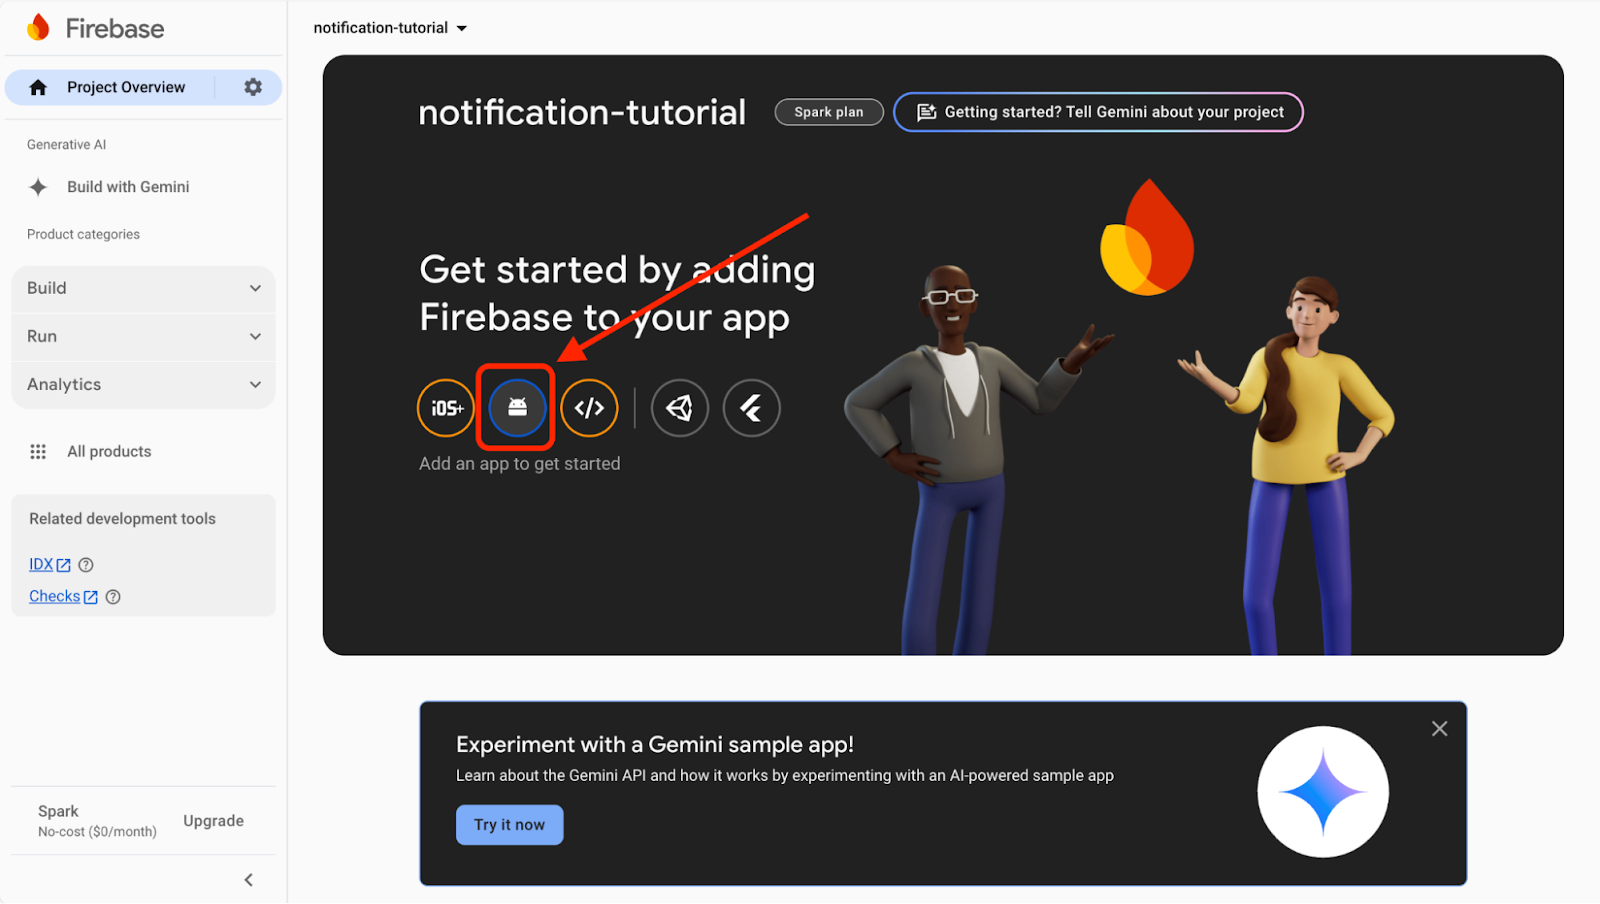
When you get on the Firebase console, click on the Android icon to create the Android app.
After providing all the necessary app details in Firebase, download the google-service.json file that contains the Firebase configuration, and place it inside the app folder in your Android project like shown below:
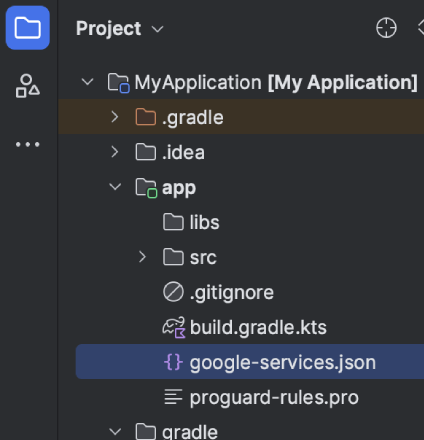
To allow Firebase on Android use the credentials, the google-services plugin must be enabled on the project. This requires modification to two files in the Android directory.
First, add the google-services plugin as a dependency inside your /android/build.gradle file:
buildscript {
  dependencies {
    // ... other dependencies
    classpath 'com.google.gms:google-services:4.4.2' // <- Add this line
  }
}
Then, execute the plugin by adding the following to your /android/app/build.gradle:
apply plugin: 'com.android.application'
apply plugin: 'com.google.gms.google-services' // <- Add this line
And that’s about it, Android configuration is complete. We will test notifications once the configurations and coding part are complete.
iOS Setup
It's now time to configure the iOS app. Go back to the Firebase console and click on the iOS icon to create the iOS app.
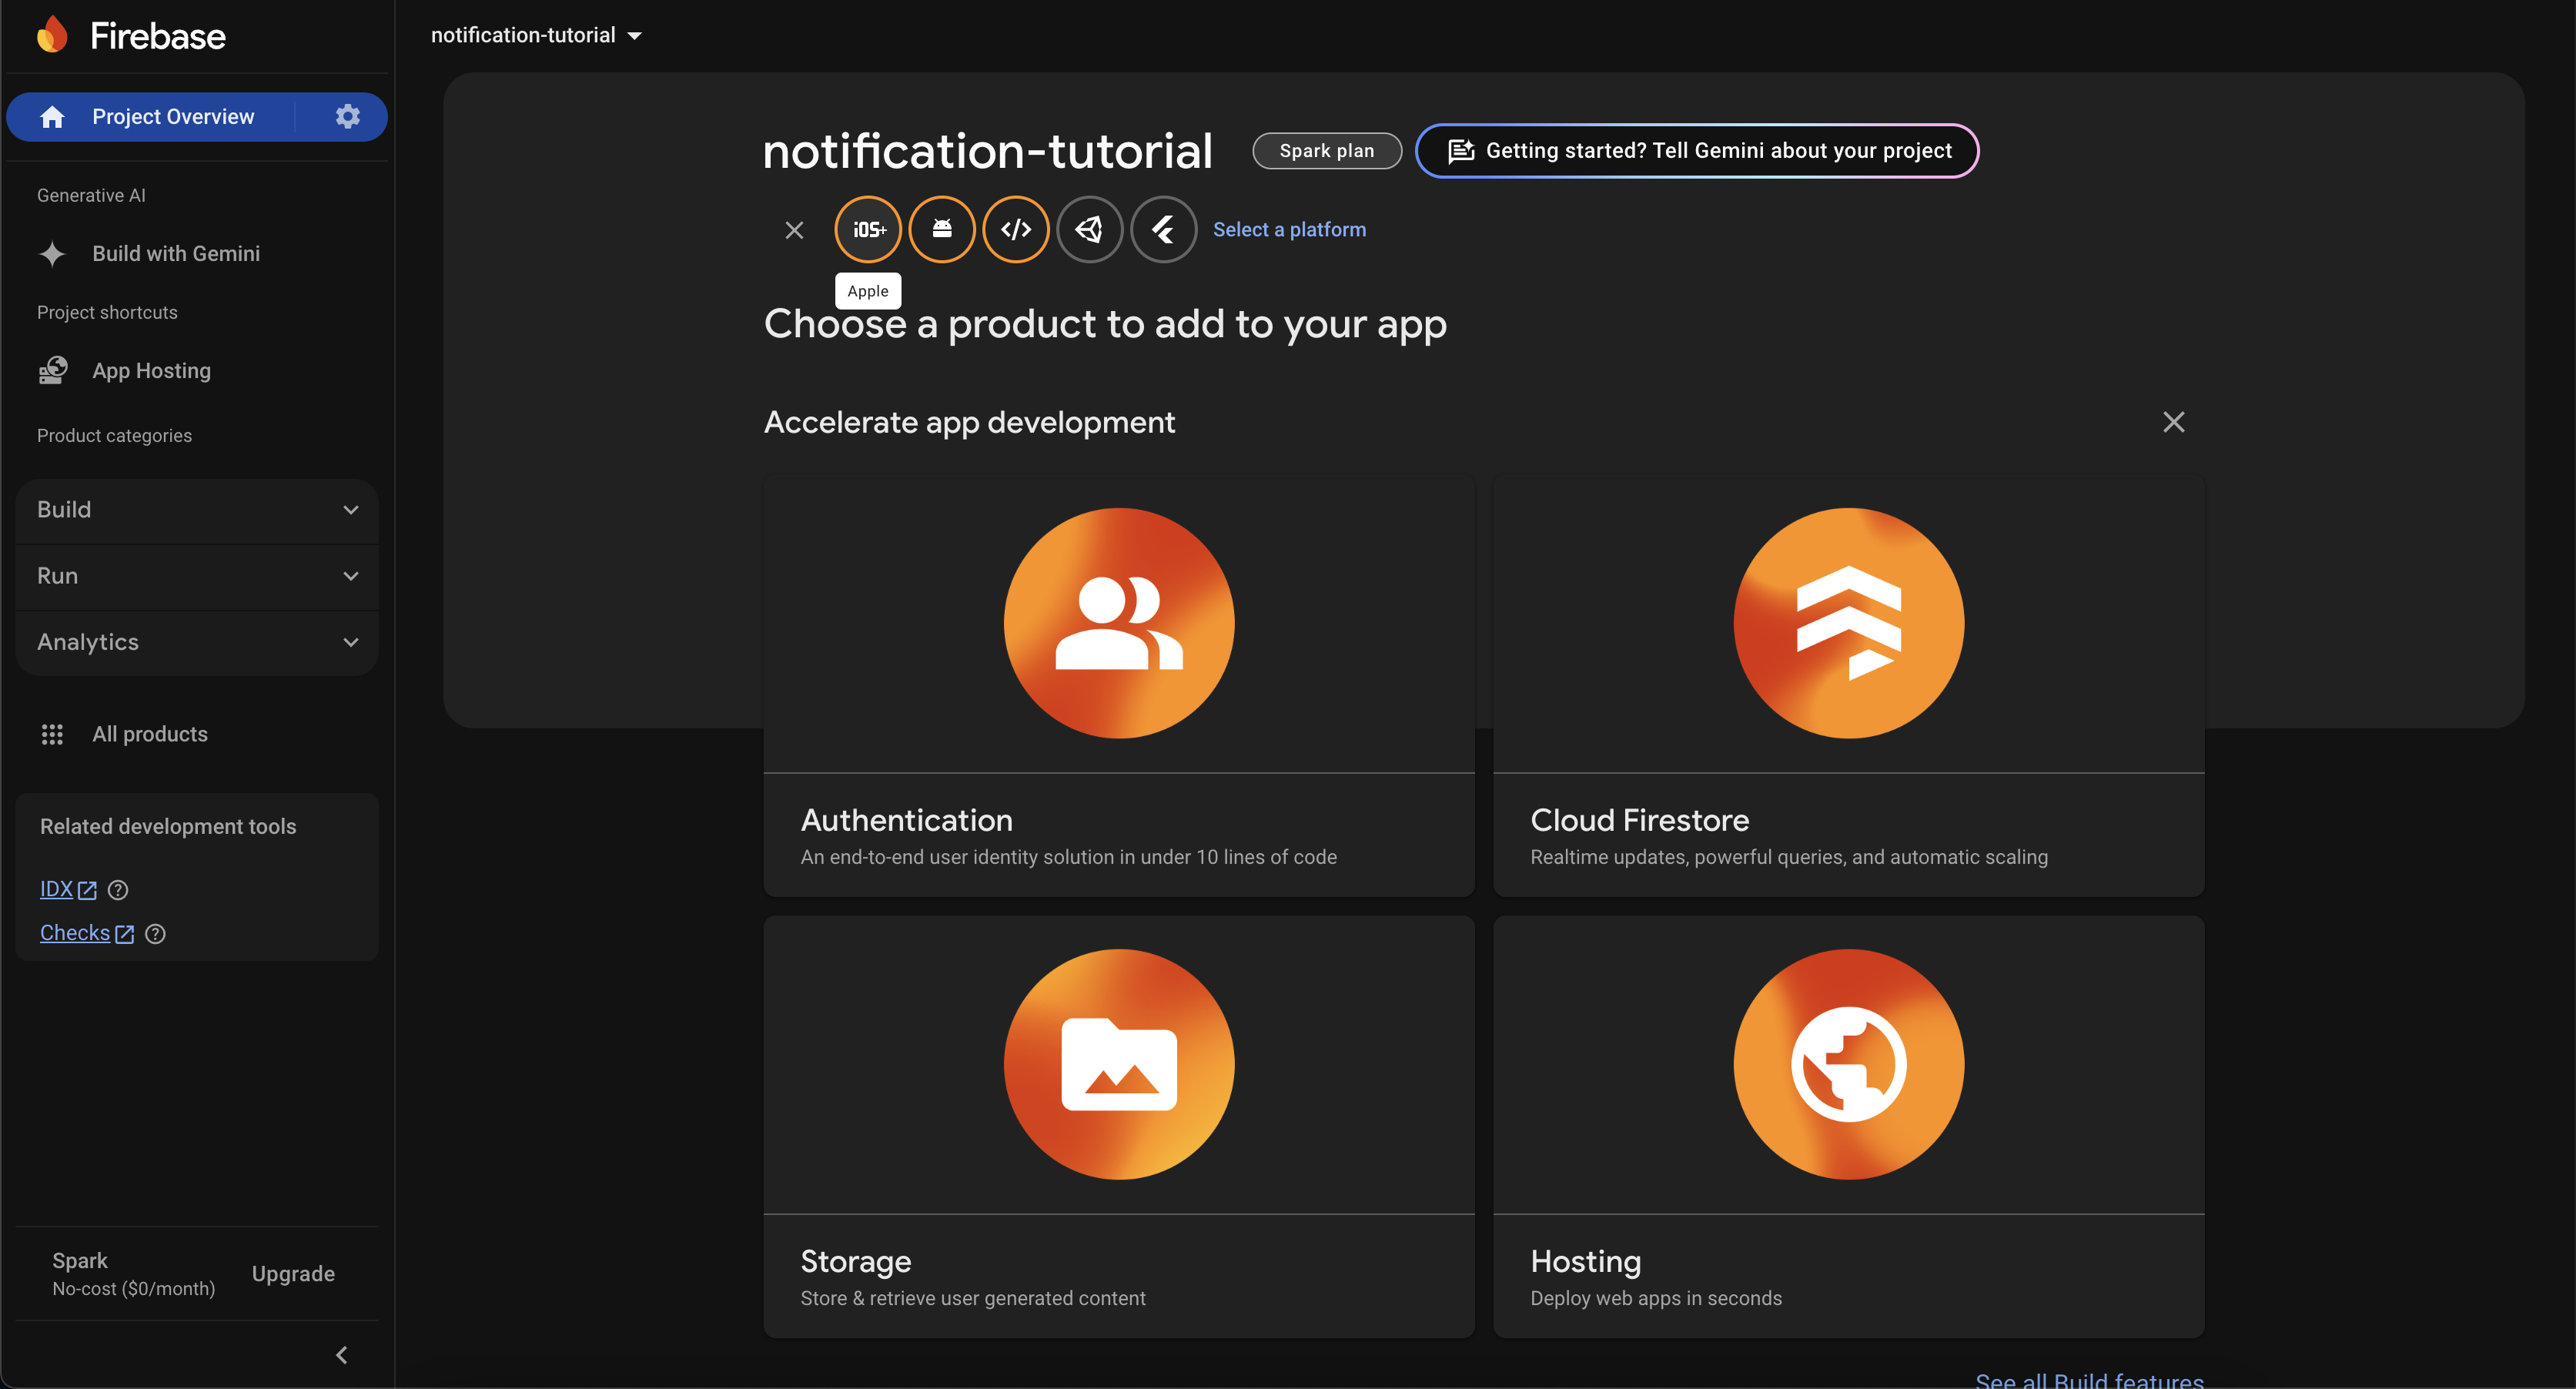
Similar to the Android setup, provide all the necessary information about your iOS app, i.e. iOS Project name, iOS Bundle ID, etc.
Next, download the GoogleService-Info.plist file that contains Firebase configuration and place it inside the iOS project at the root folder, as shown below:
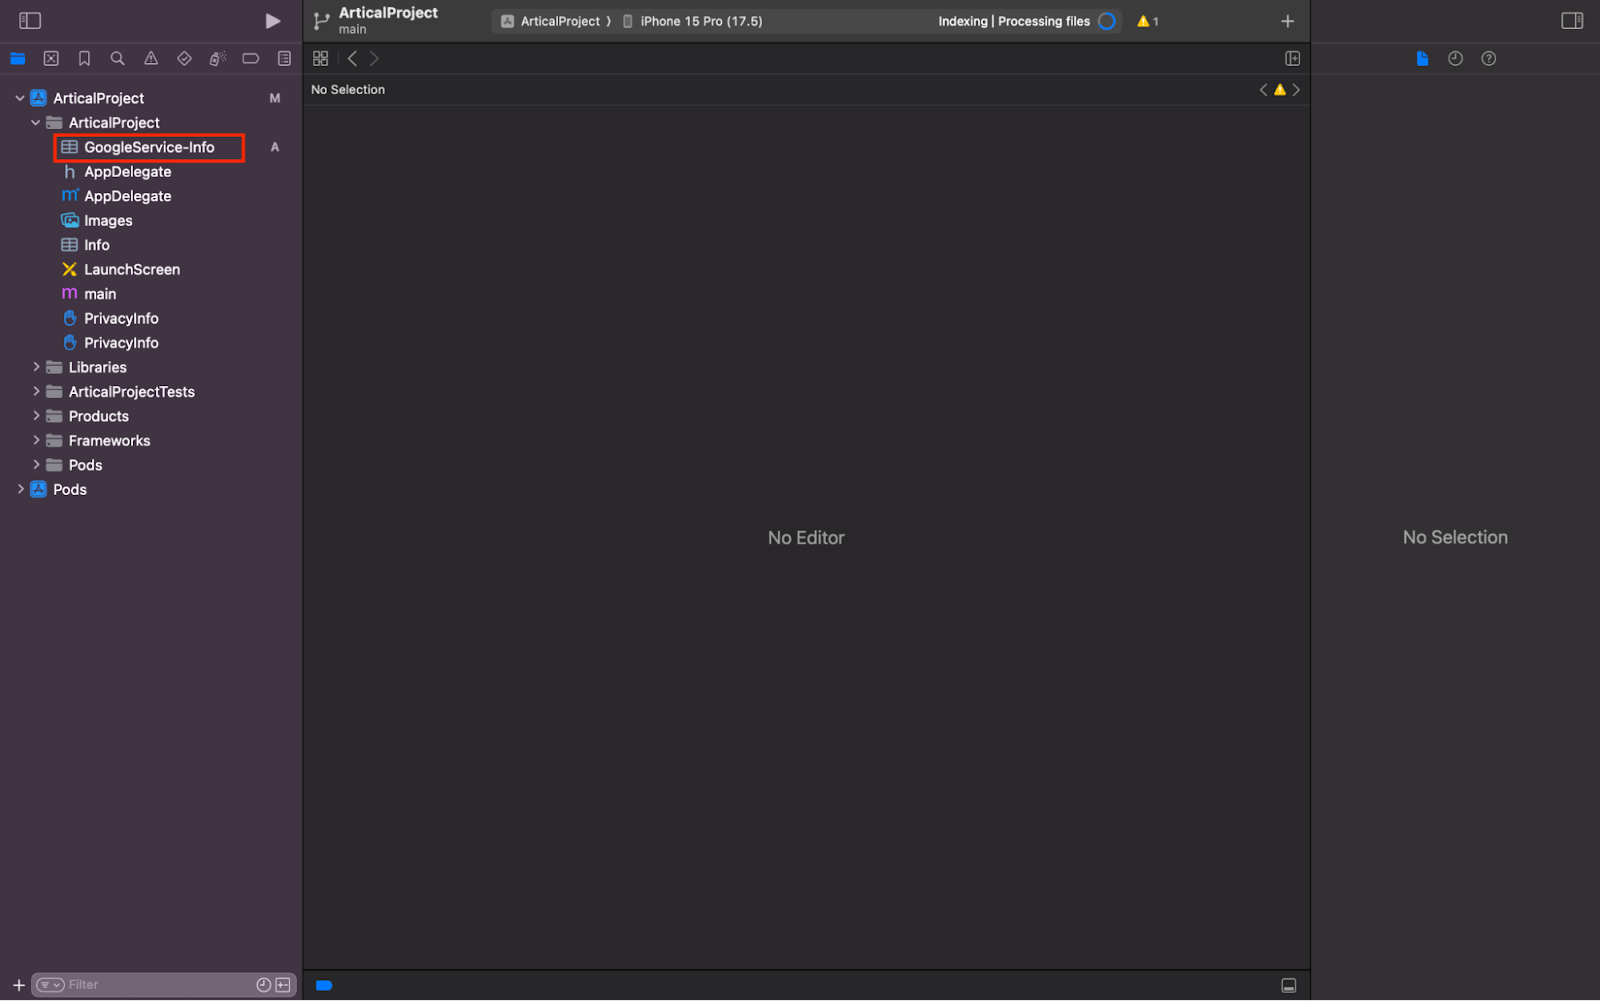
To allow Firebase to use the credentials on iOS, the Firebase iOS SDK must be configured. You can do this by opening your AppDelegate.m file, and do the following:
First, import the Firebase SDK. Then add [FIRApp configure]; line to your existing didFinishLaunchingWithOptions method:
#import <Firebase.h>

- (BOOL)application:(UIApplication *)application didFinishLaunchingWithOptions:(NSDictionary *)launchOptions
{
  [FIRApp configure]; // <- Add this line
}
With iOS configurations complete, let’s move to code integration for received push notifications.
Usage
The Firebase cloud messaging service (FCM) is used to send push notifications. FCM messages can be sent to real Android/iOS devices and Android emulators (iOS simulators however do not handle cloud messages). A message is simply a payload of data that we receive in the notification.
Handling notifications in different states
We need to handle notifications in three app states which are:
- Active (app is open in foreground mode);
- Background (app is in minimized mode or in background state);
- Killed (app is closed/killed).
Firebase provides two different callback functions - one for handling messages received when the app is killed or in the background mode; and another for processing messages received when the app is active in the foreground.
To receive push notifications, your app has to request permission for push notifications, which you can achieve by running:
import messaging from '@react-native-firebase/messaging';

async function requestUserPermission() {
  const authStatus = await messaging().requestPermission();

  const enabled =
    authStatus === messaging.AuthorizationStatus.AUTHORIZED ||
    authStatus === messaging.AuthorizationStatus.PROVISIONAL;

  if (!enabled) {
    Alert.alert('Oops!', 'Push notifications are not authorized.');
    return false;
  }

  return true;
}
Next, add onMessage event handler to receive Active push notifications in your app.
useEffect(() => {
  const unsubscribe = messaging().onMessage(async (remoteMessage) => {
    const { title, body } = remoteMessage.notification;

    Alert.alert(title, body);
  });

  return () => unsubscribe();
}, []);
To handle Background push notifications, add setBackgroundMessageHandler event handler:
messaging().setBackgroundMessageHandler(async (remoteMessage) => {
  console.log('Message handled in the background!', remoteMessage);
});
Lastly, we need the FCM token, which is a unique identity of the device for sending/testing push notifications. Use this FCM token in your api to send push notifications to this device.
const token = await firebase.messaging().getToken();
Great, now let's put it all together in one component and test it.
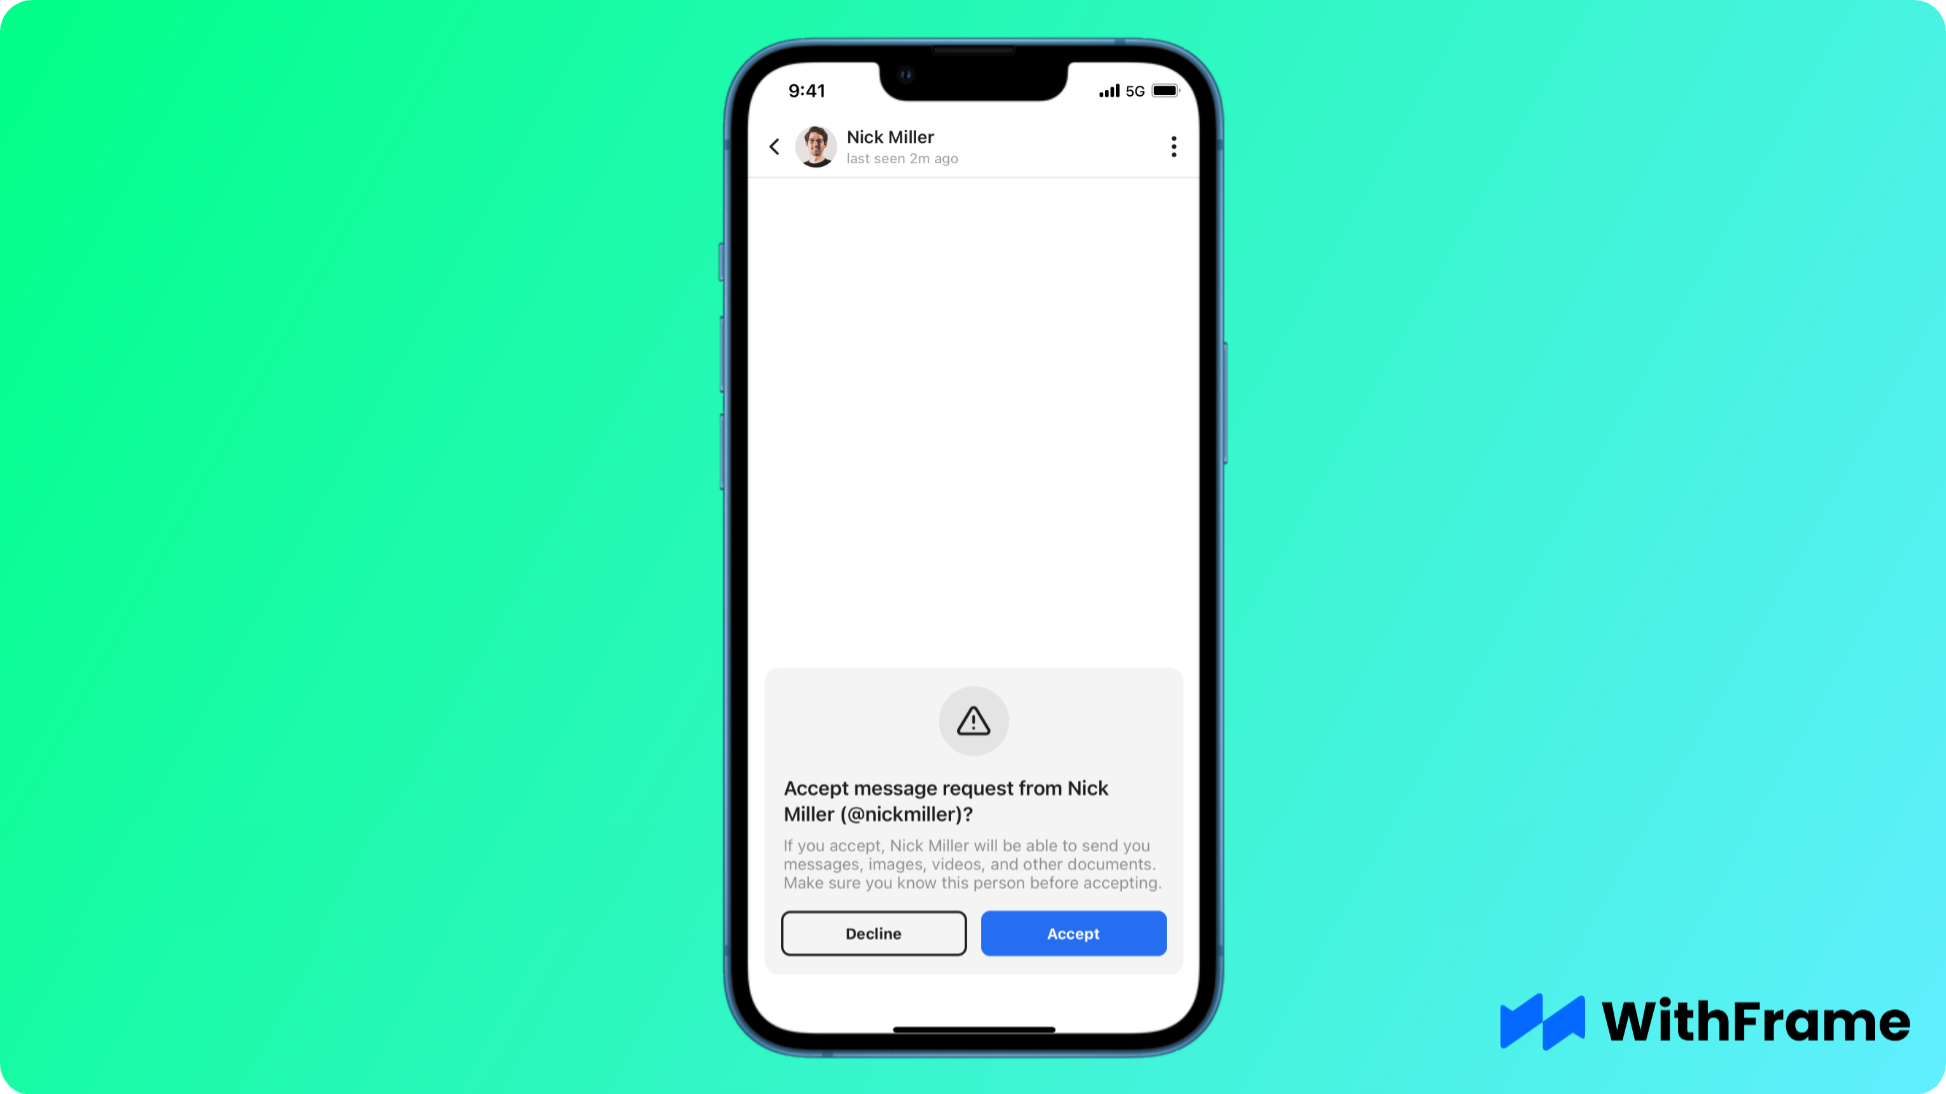
For this example we will be using one of the WithFrame's pre-built alert component requesting user permissions.
import React, { useEffect } from 'react';
import { View, Text, Button, Alert } from 'react-native';
import messaging from '@react-native-firebase/messaging';

async function requestUserPermission() {
  const authStatus = await messaging().requestPermission();

  const enabled =
    authStatus === messaging.AuthorizationStatus.AUTHORIZED ||
    authStatus === messaging.AuthorizationStatus.PROVISIONAL;

  if (!enabled) {
    Alert.alert('Oops!', 'Please allow this app to send push notifications.');
    return false;
  }

  return true;
}

messaging().setBackgroundMessageHandler(async (remoteMessage) => {
  console.log('Message handled in the background!', remoteMessage);
});

export default function Example() {
  useEffect(() => {
    const unsubscribe = messaging().onMessage(async (remoteMessage) => {
      const { title, body } = remoteMessage.notification;

      Alert.alert(title, body);
    });

    return () => unsubscribe();
  }, []);

  return (
    <SafeAreaView style={{ flex: 1, backgroundColor: '#fff' }}>
      {/*
        The rest of the component can be found here: https://withfra.me/components/alert/message-request-alert-in-chat-screen?ref=article
      */}

      <TouchableOpacity
        onPress={async () => {
          if (!(await requestUserPermission())) {
            return;
          }

          const token = await messaging().getToken();

          // send this token to your API
          await sendToApi('/user/notifications', { token });
        }}
        style={styles.btnPrimary}
      >
        <Text style={styles.btnPrimaryText}>Accept</Text>
      </TouchableOpacity>
    </SafeAreaView>
  );
}
React Native implementation is done here, now let's try sending a push notification.
Sending push notification
Let's create a simple NodeJS script to test sending and receiving push notifications.
You will need Firebase service account for this, so first go to your Firebase Console -> Service accounts and click "Generate new private key".
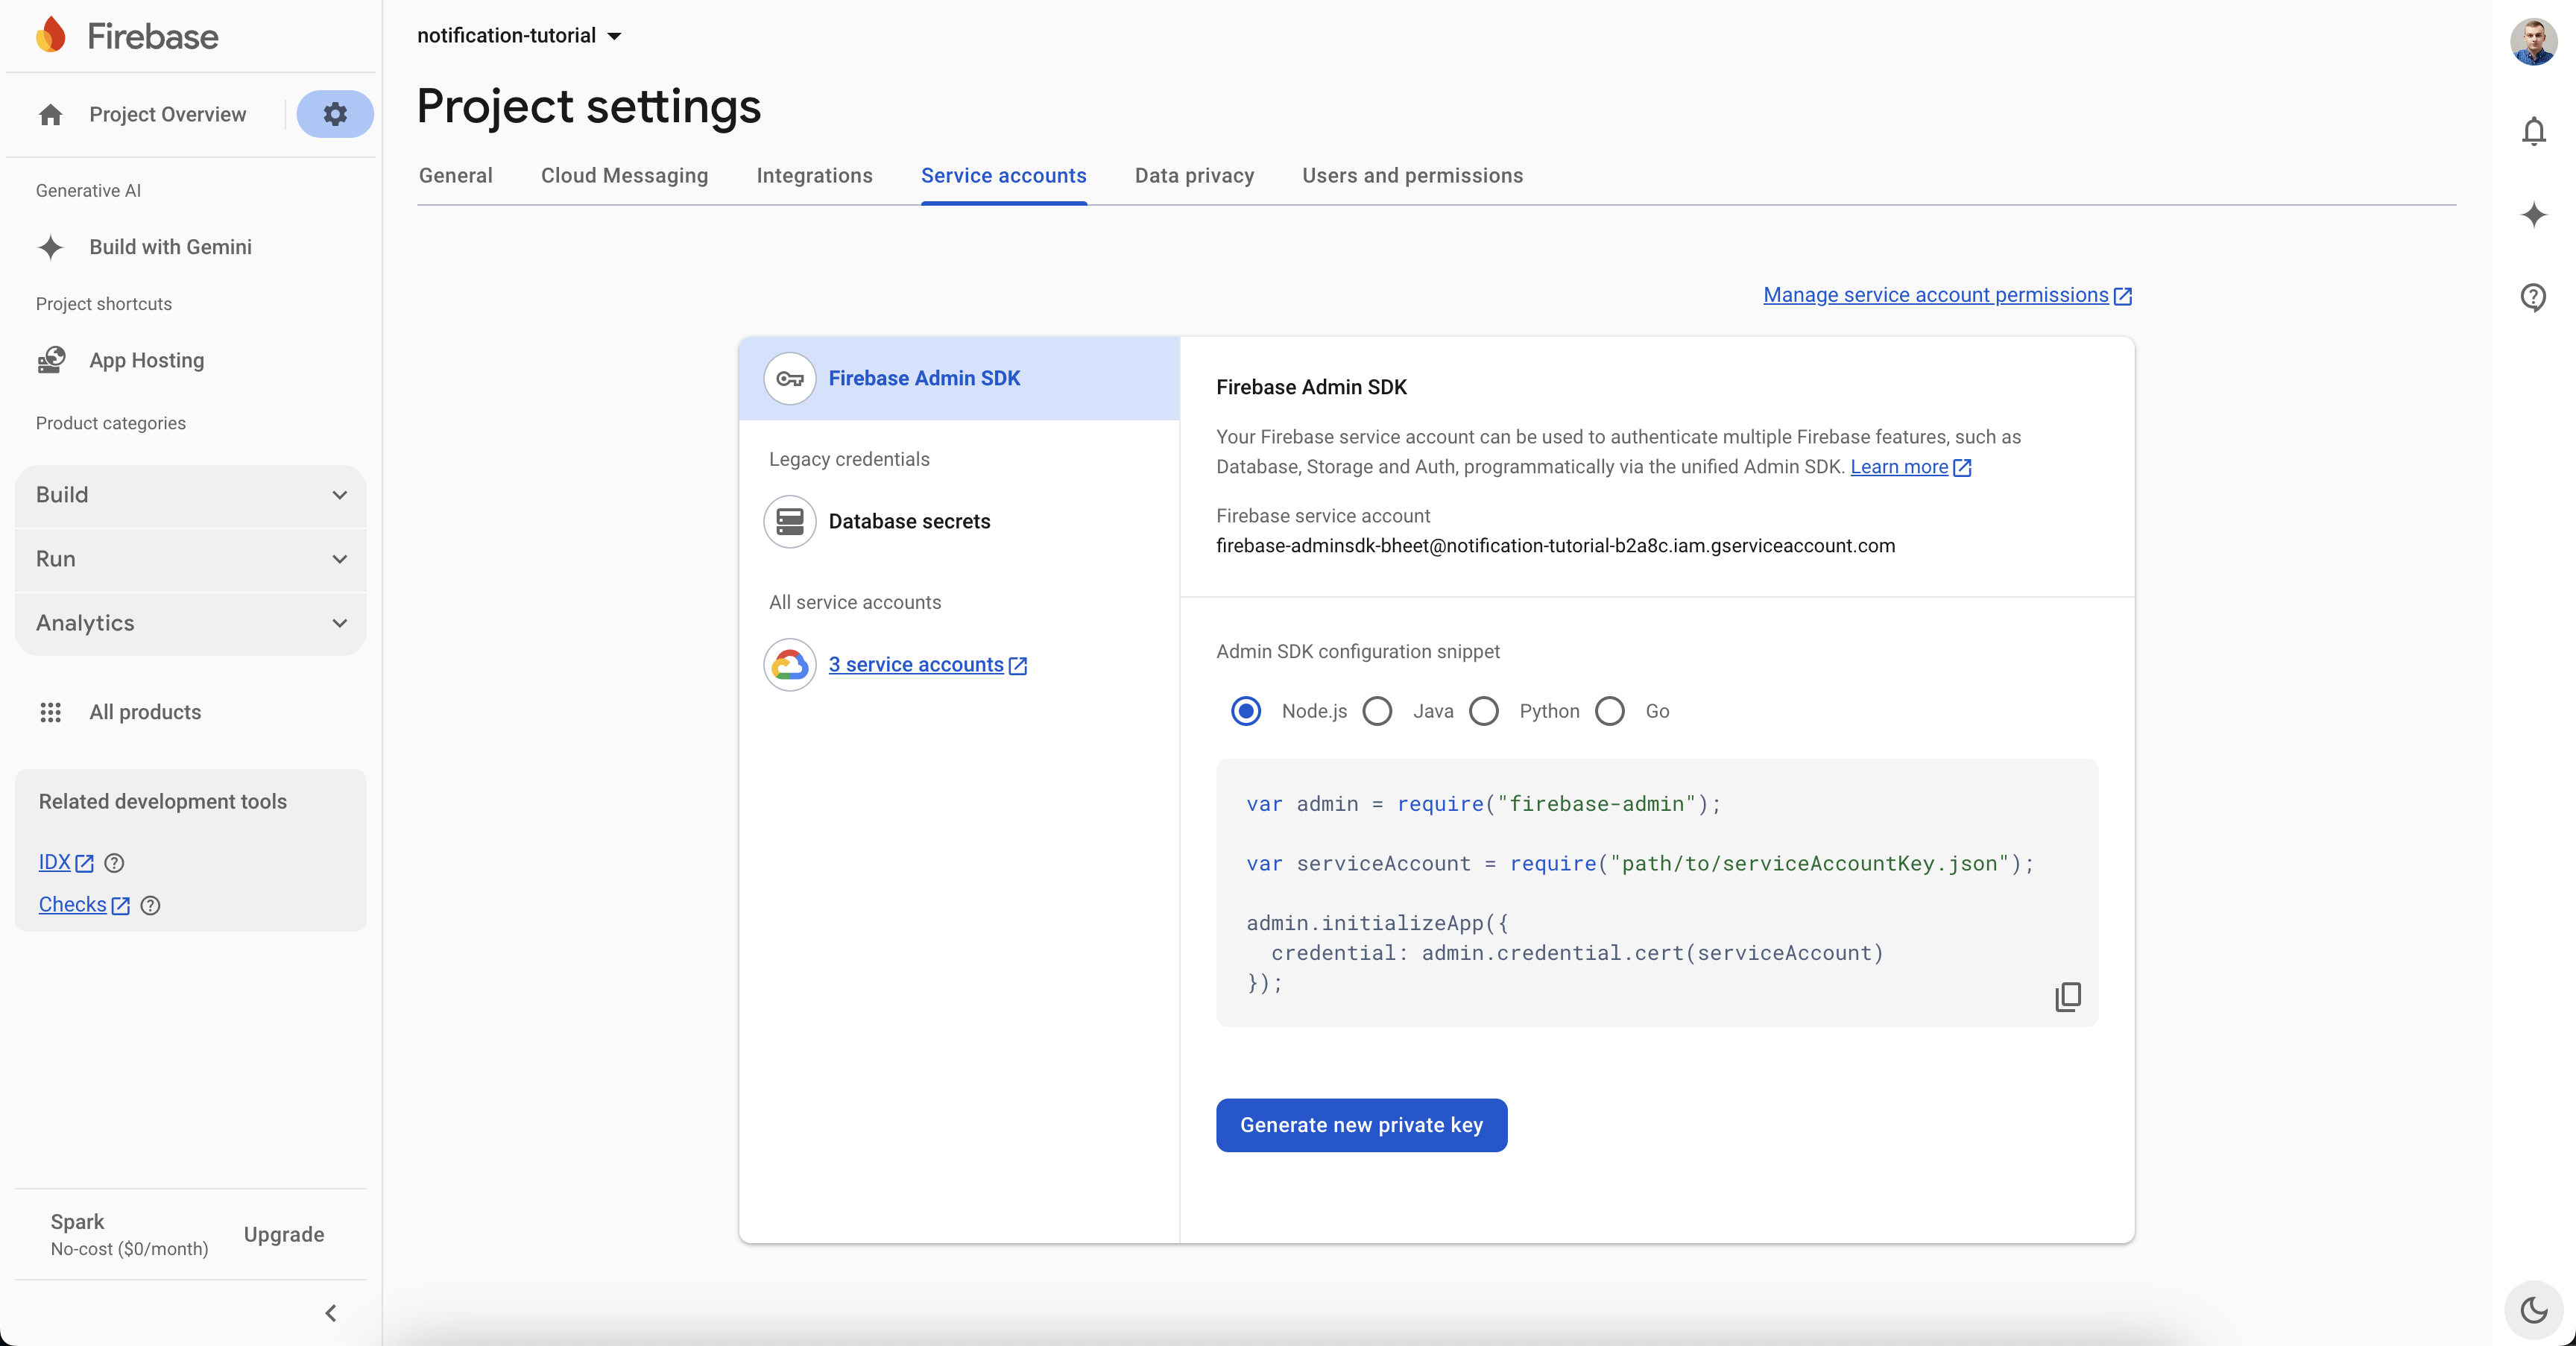
We can then create a simple NodeJS script that uses firebase-admin npmjs package to send push notifications to our app.
const { initializeApp } = require('firebase-admin/app');
const admin = require('firebase-admin');

const serviceAccount = require('./YOUR_SERVICE_ACCOUNT.json');

initializeApp({
  credential: admin.credential.cert(serviceAccount),
});

(async () => {
  await admin.messaging().send({
    token: 'YOUR_DEVICE_TOKEN', // replace this with the device token
    notification: {
      title: 'New message from Nick Miller',
      body: 'Looking forward to our collaboration!',
    },
  });
})();
If you need to send any custom notification data, you can use data property to do so:
await admin.messaging().send({
  token: 'YOUR_DEVICE_TOKEN', // replace this with the device token
  notification: {
    title: 'New message from Nick Miller',
    body: 'Looking forward to our collaboration!',
  },
  data: {
    // any custom data
  },
});
Local notifications
Right now we're using Alert.alert to display local notifications, however, there are several other ways to display a real notification UI even when the app is being used.
You can use react-native-notifications, react-native-push-notification, or @notifee/react-native packages to display local push notifications.
We're going to use the latter because it has the best up-to-date documentation. First, let's install that package in our app.
npm install @notifee/react-native --save
Next, let's update our onMessage handler to use this library instead of Alert.alert:
useEffect(() => {
  const unsubscribe = messaging().onMessage(async (remoteMessage) => {
    const { title, body } = remoteMessage.notification;

    // Create a channel (required for Android)
    const channelId = await notifee.createChannel({
      id: 'default',
      name: 'Default Channel',
    });

    // Display a notification
    await notifee.displayNotification({
      title,
      body,
      android: {
        channelId,
        pressAction: {
          id: 'default',
        },
      },
    });
  });

  return () => unsubscribe();
}, []);
This tutorial outlines a preferred method for handling push notifications in React Native today.
The mobile development world, however, is dynamic, so it's important to review the latest recommendations to ensure optimal implementation.